

Raspberry Pi Wlan To Lan Bridge
Typically, WiFi routers for Internet admission are also Wifi admission points. In such cases, the access point has a DHCP and DNS server. So yous configure your own IP network. But if you already have a DHCP and DNS server in the local network, the functioning of an additional wireless router does non make much sense. Peculiarly because the cascading of routers unnecessarily creates difficulties. This usually manifests itself with connection issues.
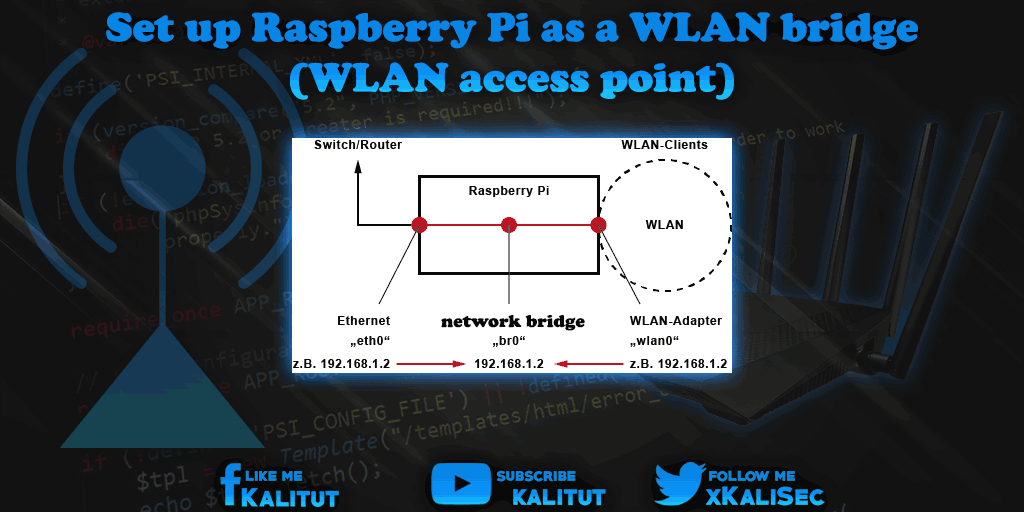
In general, it is sufficient to operate Raspberry Pi every bit a network span, which mediates the data packets and connections betwixt Wifi and LAN.
A network bridge, in English Bridge, connects 2 network segments. The connected computers are all in the aforementioned logical IP network and receive their IP configuration from the same address range.
Of class, operating Raspberry Pi every bit a network span requires that the local network already has a DHCP server, a DNS server, and a default gateway.
chore
- Check if the Wifi adapter has an access point way.
- Fix up the wireless adapter equally a wireless LAN access point.
- Set up up the Ethernet port as a transition to the wired network.
Note: Name of the network interfaces
Since Raspbian Stretch, the Ethernet and Wifinetwork interfaces have different names. So no longer "eth0" and "wlan0", merely "enx …" and "wlx …". This concerns USB-connected network adapters whose names differ from the designations mentioned here. This means that i must get-go make up one's mind the private name or modify the naming to the onetime method.
- Change network interfaces in Raspbian Stretch
Check requirements
To avoid setup bug, information technology is recommended to employ a fresh Raspbian image. A Raspbian Jessie Lite is sufficient. In addition, you should make sure that the wireless adapter used with Raspberry Pi basically works and controls the access signal mode. It works with the internal Wifi adapter in Raspberry Pi 3.
Kickoff of all, let'due south come across if the intended Wifi adapter is in AP way. To check this, the wireless tools must exist installed.
If this command ejects one or more lines with "AP", then everything is in the green zone and the Wifi adapter dominates the access point mode. Then the Wifi adapter is suitable for our task. If not, and then you should get another Wifi adapter.
- WiFi adapters that are suitable for operating an access bespeak
In Raspbian Jessie, a DHCP Client Daemon (DHCPCD) is enabled by default. The network configuration is done in the file " /etc/dhcpcd.conf ". For a part of the configuration of the network span nosotros utilise the file "/ etc / network / interfaces" here. The DHCP Client Daemon is not affected.
Still, information technology is important to determine if the dhcpcd is active at all.
Then we have to brand sure that both the Ethernet interface (eth0) and the Wifi adapter (wlan0) are working and in identify.
Both network interfaces (eth0 and wlan0) must exist present. The IP configuration is irrelevant.
Update arrangement and install software
If Raspberry Pi and the WiFi adapter meet all requirements, and so we can get started. We start with the installation of the necessary software. Before that we exercise a organization update.
sudo apt-get update sudo apt-get upgrade > So we need ii things: in one case an access betoken daemon and software for the network bridge. The Host Admission Point Daemon (HostAPD), in brusk "hostapd", is a Wifi authenticator. He takes care of offering encrypted Wifi functions and the required authentication of the Wifi clients. For example via WPA2-PSK.
"bridge-utils" contains libraries and commands to set up network bridges.
sudo apt-get install hostapd bridge-utils Afterward the installation, the configuration of the Wifi AP host and the network bridge is washed.
Configure WiFi AP Host (hostapd)
The configuration of the wireless AP host:
sudo nano /etc/hostapd/hostapd.conf The file should not be however and be empty. If the file does exist, and so you should completely override information technology.
In the file we enter the post-obit minimal configuration. Of class, in that location are even more parameters that are irrelevant in this case.
# Span operation bridge = br0 # Interface and driver interface = wlan0 # Driver = nl80211 # WLAN configuration ssid = WLANbridge channel = 1 hw_mode = g ieee80211n = i ieee80211d = ane country_code = EN wmm_enabled = 1 # Wi-Fi encryption auth_algs = 1 wpa = ii wpa_key_mgmt = WPA-PSK rsn_pairwise = CCMP wpa_passphrase = test exam Three settings have to be fabricated individually. One is the Wifi name ("ssid"), the channel ("channel"), which can be freely configured from one to thirteen, simply you do not have to modify anything here. You may have to alter the channel here, if a Wifi analysis shows that already several other Wifis occupy this channel. In principle, several Wifis tin occupy the same channel. This is better than when the channels overlap.
The tertiary parameter is the Wifi password ("wpa_passphrase"). Here you should enter a password of at least 8 characters in clear text.
If you already have a wireless access point, then it is not wrong to use its Wi-Fi name and Wi-Fi password. The clients and then automatically select the Wifi for which in that location is better reception. To test whether the configured Wi-Fi bridge actually works, you should temporarily select a different Wifi name ("ssid").
Note on the Wifi driver: At that place is the parameter "driver" in this configuration file, which is commented out (#). Normally "hostapd" automatically loads the correct driver. Of course, that does not work. So you have to explicitly specify the correct commuter here.
Then relieve and shut with Ctrl + O, Return, Ctrl + 10.
Because this file contains the Wifi password in apparently text, only the user "root" should have read admission to this file.
sudo chmod 600 /etc/hostapd/hostapd.conf Do not worry, with the user "pi" you can change and save the file at whatever fourth dimension.
Configure and commission the network bridge
Now we have to configure the bridge and the network interfaces.
sudo nano /etc/network/interfaces For this purpose, we brand the following minimal configuration in the configuration file for the network settings.
# Localhost car lo iface lo inet loopback # Ethernet car eth0 allow-hotplug eth0 iface eth0 inet transmission # WIRELESS INTERNET ACCESS car wlan0 allow-hotplug wlan0 iface wlan0 inet transmission wireless ability off # Network bridge car br0 iface br0 inet dhcp bridge_ports eth0 wlan0 # build bridge bridge_fd 0 # no forwarding delay bridge_stp off # disable Spanning Tree Protocol Then save and shut with Ctrl + O, Return, Ctrl + X.
It would besides be conceivable to requite the Ethernet interface a static IP configuration. This need not be. In this form, the Wifi span has the advantage that information technology works on whatsoever local network if the IPv4 configuration is delivered via DHCP. If IPv6 is enabled then it works as well.
Notation: If you intend to give Raspberry Pi a static IPv4 address, then configure the br0 interface, not "eth0" or "wlan0", otherwise you lot will no longer be able to connect to Raspberry Pi via SSH ,
For a static IP configuration, it is also recommended to deactivate the DHCPCD.
sudo service dhcpcd stop sudo systemctl disable dhcpcd More information:
- Static IPv4 address for Raspbian Jessie and Stretch
For all changes to be accustomed, we recommend a restart now.
After the restart, yous should check whether the network bridge has gone into operation.
Notation: Do not be dislocated by the fact that but the interface "eth0, merely" wlan0 "has not notwithstanding been added, the interface" wlan0 "will not be added to the network bridge until the interface goes live with" hostapd ".
Commission WiFi-AP host (hostpad)
Outset we start the "hostapd" with the option "-dd" in debug mode. We will meet "all" error letters.
sudo hostapd -dd /etc/hostapd/hostapd.conf In debug fashion (parameter -dd), "hostapd" will always produce messages, which need not be error messages. The debug way is very informative in this case. If the configuration is correct and the Wifi adapter plays along, the configuration runs through. The programme will not be finished. That is, "hostapd" does not return for control input. It tin be ended with "Ctrl + C".
If the "hostapd" crashes, then something is wrong. Still, the errors are extremely various and the associated mistake letters are not e'er clear. A popular error is the missing "sudo" when calling the control.
Other sources of mistake can be ruled out if you lot make certain that the wireless adapter works in principle and mastered the AP manner.
Another source of error is the distribution used. It will definitely work with "Raspbian". Other stripped-down distributions tin cause problems.
You lot can also call "hostapd" normally.
sudo hostapd /etc/hostapd/hostapd.conf A skilful sign is when the message "wlan0: AP-ENABLED" appears. Then you can examination the Wifi bridge. For this one tries with a Wifi customer to detect the Wifi and log in there.
In the command line you lot can discover how the Wifi customer logs in (Continued) and as well logs information technology out over again (Asunder) when it ends the connection.
Annotation: If yous brand the configuration via SSH, then you should do the testing of the Wifi bridge with some other customer, considering otherwise you shoot the SSH connection past changing the wireless network.
With the installation of "hostapd" it is automatically started in the background when booting. However, y'all nonetheless have to tell the daemon where to observe its configuration.
If "hostapd" is yet running, and so we terminate it with "Ctrl + C". Then we open a configuration file:
sudo nano /etc/default/hostapd In it we add together the following parameters:
RUN_DAEMON = yeah DAEMON_CONF = "/etc/hostapd/hostapd.conf" And so save and close with Ctrl + O, Return, Ctrl + X.
After a restart, "hostapd" will be started automatically with the created configuration. The Wifi bridge should and so exist bachelor every bit a Wifi admission indicate.
Troubleshooting: Cheque "hostapd"
The status of "hostapd" can be checked as follows:
sudo systemctl status hostapd The "hostapd" has been activated when the following message appears: " Starting advanced IEEE 802.11 management: hostapd. "
If not, the following error bulletin appears: " Starting advanced IEEE 802.11 direction: hostapd failed! "
Then please check whether the Wifi adapter dominates the AP mode:
If non, no output will appear here. So yous should utilize a different wireless adapter.
Another trouble tin can exist caused past the DHCPCD, because the interface breaks nether the smash and thus can preclude the commissioning of the bridge.
To do this we open the configuration file of the DHCPCD and enter a line in that location.
sudo nano /etc/dhcpcd.conf Exclude network interface from the configuration by the DHCPCD:
This line excludes the relevant interface from the network configuration.
Troubleshooting: Check network bridge
The operation of this Wifi span can fail in practice on one affair or another. Equally a dominion, it is hard to get to the lesser of the reasons.
Basically, the Wifi interface is only added to the bridge when the "hostapd" goes into functioning successfully.
If and so, so yous tin can meet if the bridge has also gone into operation.
Hither in the column "interfaces" both "eth0" and "wlan0" must exist listed.
Annotation: Information technology may take a few seconds for the bridge to add together all the interfaces. Therefore, exercise not panic immediately, if not even so both interfaces are displayed.
If yous are unsure at the point, and then you should take a wait at the system messages.
dmesg | grep br0 There should be the following lines:
device wlan0 entered promiscuous way br0: port 2 (wlan0) entered forwarding state If not, then you should look for error messages related to "wlan0" and "br0".
I should know that there are USB sticks (regardless of the chipset), which are quite bitchy during initialization during the boot process. For instance Fritz Wifi sticks of AVM. The initialize kickoff a bulldoze (for the driver installation). Only and so does the stick get into Wifi operation. Respective instructions can be found with "dmesg".
This of course has consequences for the automatic first of "hostapd". It can but go into operation if the Wifi interface is available.
It may well be that you lot have to wait ane to two minutes afterwards the kick process on the wireless interface.
If it exists, endeavor to offset the "hostapd" manually.
sudo systemctl start hostapd sudo systemctl condition hostapd If the service was started, then it is basically.
If you want to know later, which MAC addresses (Wifi clients) are connected to the span:
If you changed the configuration
If you alter the hostapd configuration during operation, and so y'all should brand a restart of the "hostapd" afterwards.
sudo systemctl restart hostapd Alternatively, you can stop information technology and beginning again.
sudo systemctl stop hostapd sudo systemctl commencement hostapd If the automated commencement in the groundwork is not desired when booting, you can also turn information technology off with:
sudo systemctl disable hostapd The automatic kickoff in the background when booting can be optionally switched on with:
sudo systemctl enable hostapd Notes on Raspberry Pi as a WiFi bridge
No matter which solution, as a Wifi access point, Raspberry Pi is non so well suited for its interface operation. The facility is mistake prone, cumbersome and may not exist prophylactic. Apart from that, the Raspberry Pi with the necessary equipment is more expensive than a wireless router. If y'all seriously and permanently desire to operate a wireless admission point, y'all should have a look at OpenWRT and get a cheap compatible router to do so. Price, but also from the comfort is much more interesting.
prophylactic instructions
Anyone who sets up and starts up their own network components too takes responsibility for this. With this solution, you can possibly shoot yourself in the knee. If you recall that the solution presented here is finished, then that is a fault. If you lot do not take any additional security measures, then you break yourself with this network bridge a security gap in the local network.
Please observe the safety instructions for operating a Wifi access point.
- Safe instructions for operating a Raspberry Pi as a Wifi access point
Extension: Use the WiFi bridge every bit man-in-the-center for network monitoring
This WiFi bridge is swell for recording network traffic. For example, for network monitoring or for man-in-the-middle attacks.
A man-in-the-middle is a network device capable of listening, recording and manipulating network traffic. For this to succeed, the corresponding device must be in a network connection between 2 endpoints. That's exactly the case with the Wifi bridge.
- Set network monitoring or man-in-the-middle on Raspberry Pi

Raspberry Pi Wlan To Lan Bridge,
Source: https://kalitut.com/set-up-raspberry-pi-as-wlan-bridge-wlan/
Posted by: bentleynothen1977.blogspot.com
0 Response to "Raspberry Pi Wlan To Lan Bridge"
Post a Comment